In the last post, I talked about using IO.write/2 to create cool
CLIs. After writing that post, I got lots
of great feedback along with recommendations for further topics. So that’s
exactly what I’m doing. IO.write/2 is a cool function, but the real work there
is done by the carriage return (\r). Carriage returns are a control character
that let you reset the cursor to the beginning of the current line of text,
similar to how an old-fashioned typewriter works. There are many other control
characters that do a similar job. If you want to learn more about the history of
how terminals and command line interfaces came about, I highly recommend this
Crash Course on Keyboards & Commend Line
Interfaces.
ANSI escape sequences are
similar to carriage returns: they’re sequences of bytes that can be output to
control the terminal. Almost 50 years ago they were implemented as a standard,
and allow you to move the cursor to the front of the current line similar to the
carriage return. They have a lot more functionality on top of that though. ANSI
escape sequences are a little more complicated to remember and type. They look
something like this: \u001b[0m. Good luck remembering that one! Luckily for
us, Elixir has a wonderful library built in to the language that abstracts away
the need to remember the sequences:
IO.ANSI.
Colors

One of the most common uses of IO.ANSI is to change the color of text in a
terminal output. You can see that when you run mix test and the line of green
dots crosses the screen, or when an exception is thrown and the error and
stacktrace show up in red. Well, let’s replicate some of that functionality.
We’ll start with the green. Let’s create a module called Color that has a
green function. It will accept the text to make green and return a string with
the green text. To do that, we’ll just prepend IO.ANSI.green/0 to the string
that we want to be green. Then outside of the module we can call our function so
that when we run elixir color.ex it will run the function. Make sure that you
use IO.puts/1 or IO.write/1 to output your text because just calling the
function won’t display anything.
defmodule Color do
  def green(text) do
    IO.ANSI.green() <> text
  end
end

IO.puts Color.green("This text is green")
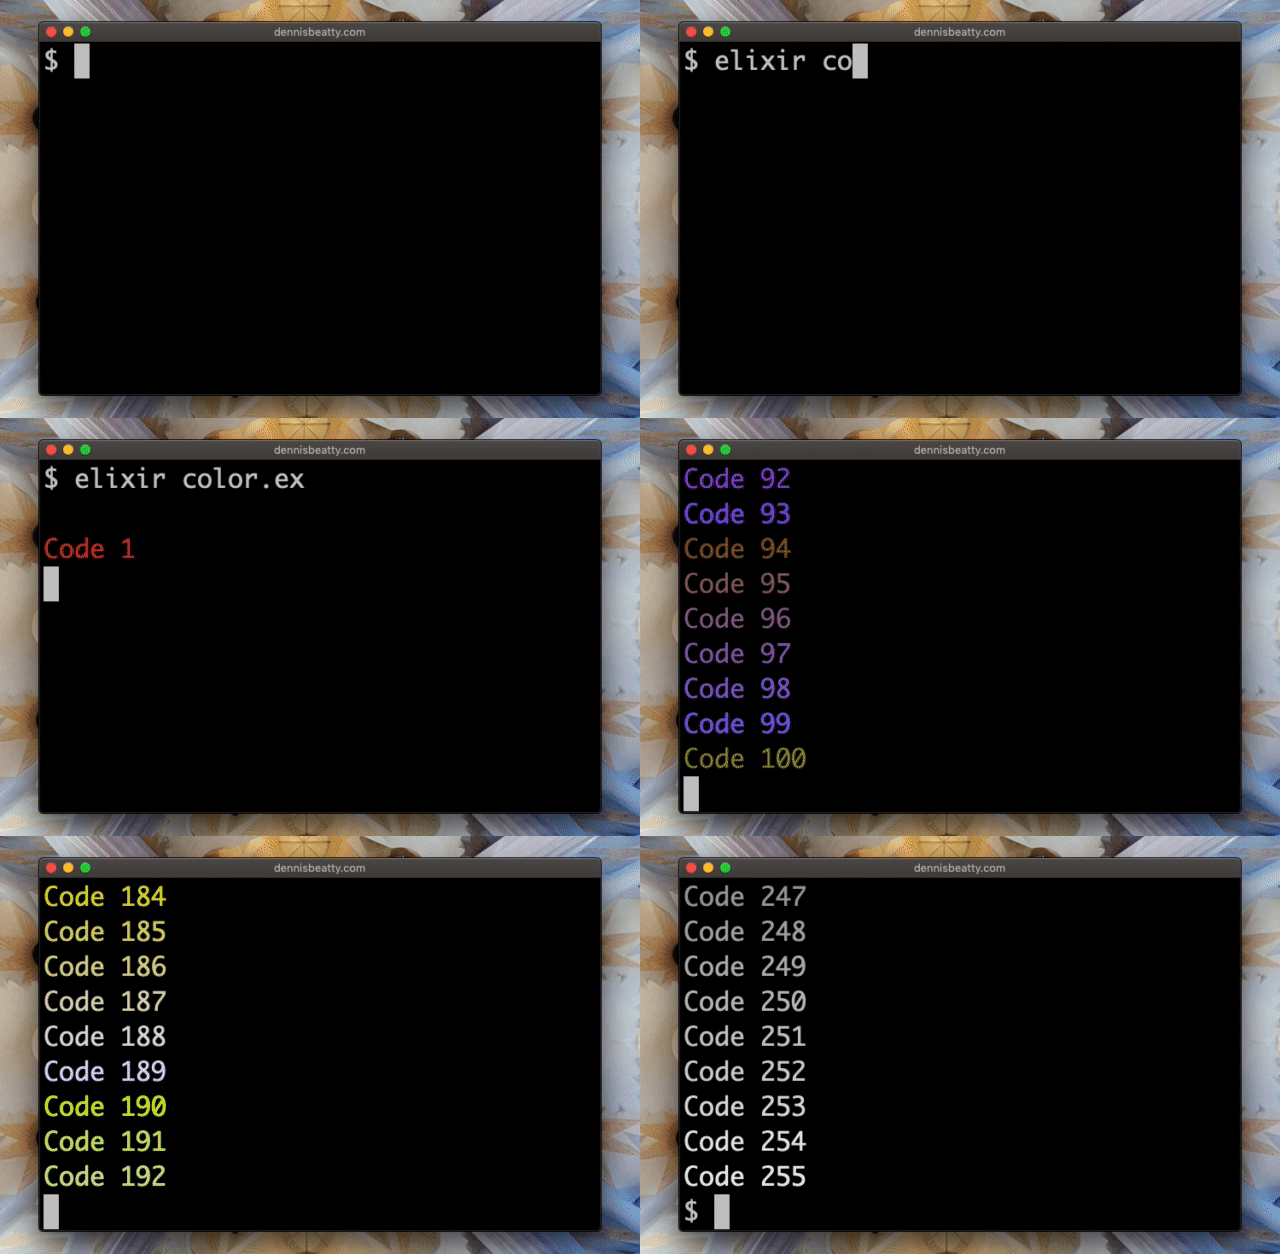
Now save the file and run it in your terminal with elixir color.ex (assuming
you named your file color.ex) and you’ll notice that after you run the
program, the next line in your terminal continues to be green. That’s because
the terminal will stick with that color until it’s told otherwise. To combat
that, we’ll need to use IO.ANSI.reset/0 in our green/1 function:
def green(text) do
  IO.ANSI.green() <> text <> IO.ANSI.reset()
end
Now things should work as planned! So we can copy this same pattern for red text:
defmodule Color do
  ...
  def red(text) do
    IO.ANSI.red() <> text <> IO.ANSI.reset()
  end
end
...
IO.puts Color.red("This text is red")
The most basic terminals support 8 different colors:
- black
- red
- green
- yellow
- blue
- magenta
- cyan
- white
You can use this method for any of the eight. You can also try out modifiers
like IO.ANSI.light_red/0 or IO.ANSI.red_background/0 or
IO.ANSI.light_red_background/0. I highly recommend checking out the
metaprogramming that implements these in the IO.ANSI source
code.
It’s an interesting bit of code.
More advanced terminals support up to 256 colors. That would be a lot of colors
to have a function for each one, so this is implemented with IO.ANSI.code/1.
It allows us to specify a code between 0 and 255 to select a color. Let’s check
out all the possibilities:
defmodule Color do
  ...
  def code(code, text) do
    IO.ANSI.color(code) <> text <> IO.ANSI.reset()
  end
end
...
Enum.each(0..255, fn code ->
  IO.puts Color.code(code, "Code #{code}")
  Process.sleep(10)
end)
All of those colors can also be used with IO.ANSI.color_background/1 to set
the background color. You can even set a background and foreground for the same
text. If you don’t want have to write that code every time to see the color
codes, you can use this
graphic.
Docker Compose

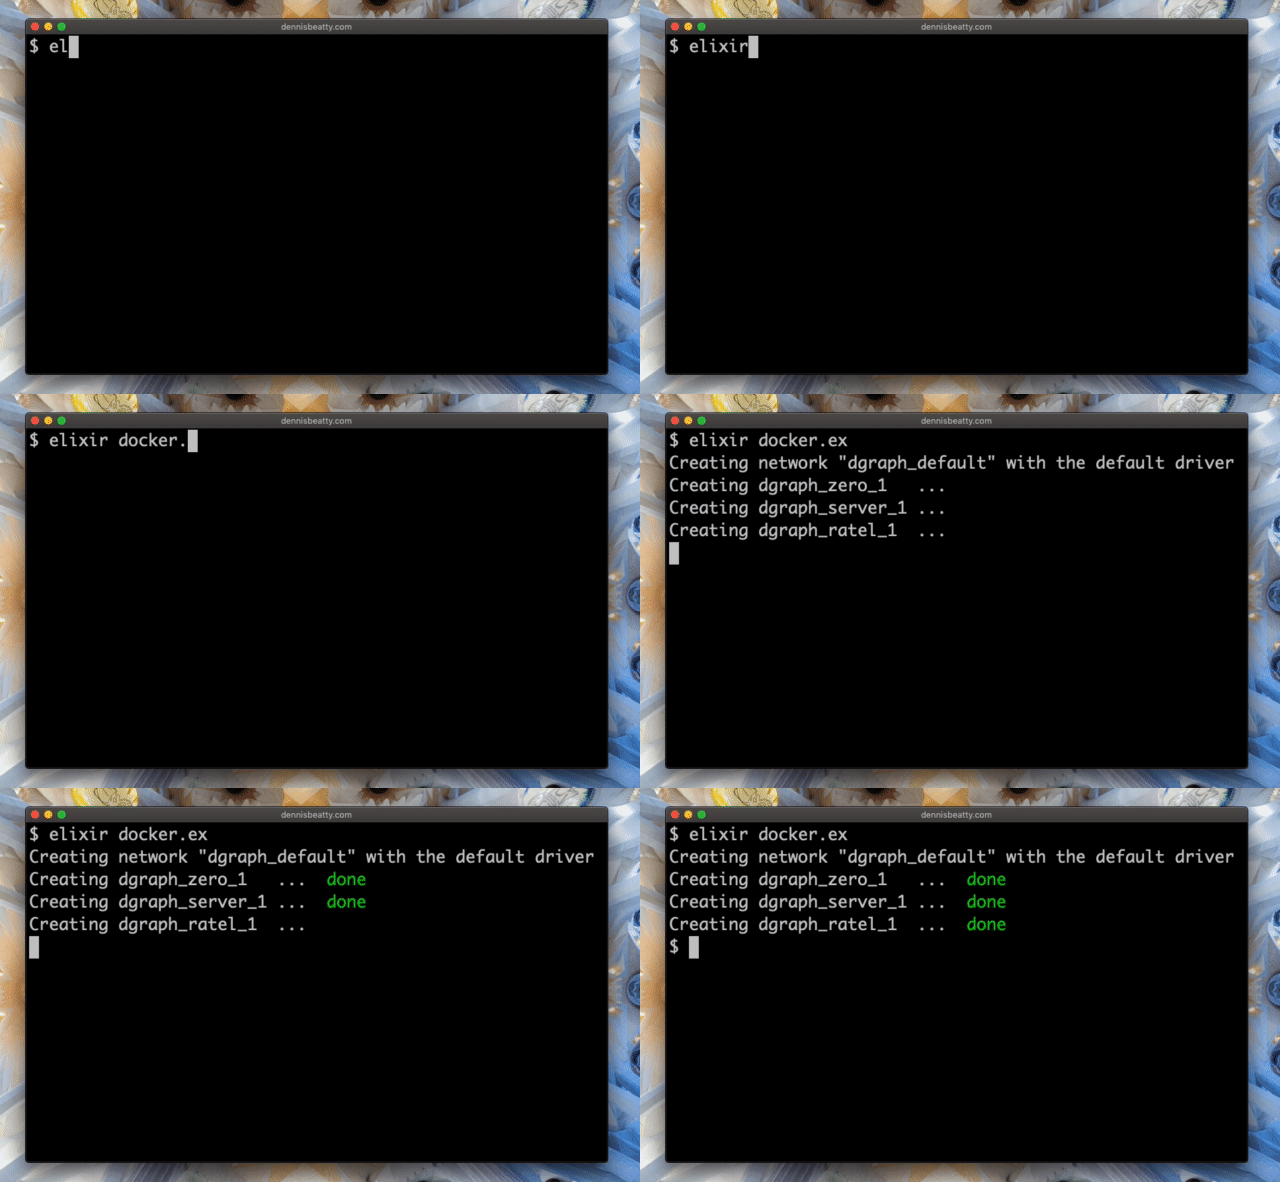
Docker Compose is a tool that allows you to control several Docker containers
from one place. I noticed that when you run docker-compose up with multiple
Docker containers defined, those containers will be started up in parallel, not
necessarily finishing in the order they started. In the command line, you will
see that it says that it’s starting all of the images, and then one by one will
print done next to the ones that finished.
Notice these aren’t on the same line, so somehow Docker is printing over
previous lines. That’s more than a simple carriage return, but luckily IO.ANSI
is up to the task. Let’s start out by creating a Docker module with an up
function that will “start” three different apps.
defmodule Docker do
  def up do
    IO.puts "Creating network \"dgraph_default\" with the default driver"
    IO.puts "Creating dgraph_zero_1   ... "
    IO.puts "Creating dgraph_server_1 ... "
    IO.puts "Creating dgraph_ratel_1  ... "
  end
end

Docker.up()
Now we need to display when each app is done “spinning up”. And to make it obvious that we’re updating these after the fact, we’ll sleep the process and update them in a different order. To do this, we’ll first want to set up a module attribute to contain the green “done” text:
defmodule Docker do
  @done_text IO.ANSI.green() <> "done" <> IO.ANSI.reset()
  ...
Then we can create a line_done/1 function that will take in the line number
that completed and append the “done” text to the end of it. We’ll start by
sleeping for a half second so we can see the work being done. Then we’ll move
the cursor to the end of the line we want to modify and write the text. Finally
we’ll need to move the cursor back to the starting position so we know where it
is and then write the whole thing to the console:
defmodule Docker do
  ...
  defp line_done(line) do
    Process.sleep(500)
    offset = 4 - line

    offset
    |> IO.ANSI.cursor_up() # move the cursor up to the line we want to modify
    |> Kernel.<>(IO.ANSI.cursor_right(30)) # move the cursor to the end of the line (30 chars)
    |> Kernel.<>(@done_text) # write the done text
    |> Kernel.<>("\r") # move the cursor to the front of the line
    |> Kernel.<>(IO.ANSI.cursor_down(offset)) # move the cursor back to the bottom
    |> IO.write()
  end
end
...
So now your whole file should look something like this:
defmodule Docker do
  @done_text IO.ANSI.green() <> "done" <> IO.ANSI.reset()

  def up do
    IO.puts "Creating network \"dgraph_default\" with the default driver"
    IO.puts "Creating dgraph_zero_1   ... "
    IO.puts "Creating dgraph_server_1 ... "
    IO.puts "Creating dgraph_ratel_1  ... "

    1..3
    |> Enum.shuffle()
    |> Enum.each(&line_done/1)
  end

  defp line_done(line) do
    Process.sleep(500)
    offset = 4 - line

    offset
    |> IO.ANSI.cursor_up() # move the cursor up to the line we want to modify
    |> Kernel.<>(IO.ANSI.cursor_right(30)) # move the cursor to the end of the line (30 chars)
    |> Kernel.<>(@done_text) # write the done text
    |> Kernel.<>("\r") # move the cursor to the front of the line
    |> Kernel.<>(IO.ANSI.cursor_down(offset)) # move the cursor back to the bottom
    |> IO.write()
  end
end

Docker.up()
If you want a followup exercise, randomize the finish state of each app so that it can either be a green “done” or a red “error”. You could also make the app list dynamic so that even with 12 lines you’re writing the status on the proper line.
Downloader

The final example this post will cover is covering the terminal (see what I did
there?). IO.ANSI has a nifty function called cover/0 that will let you cover
the entire terminal window in the current background color. So we’re going to
use that to make a nifty “downloader” UI. Let’s start by creating a screen for
specifying a save filename. We’ll create a module called Downloader and give
it a function called get_filename/0 that will allow us to capture the
filename. We’ll start with just covering the screen in our specified background
color:
defmodule Downloader do
  @background_color 53

  def get_filename do
    draw_background()
  end

  defp draw_background do
    IO.write IO.ANSI.color_background(@background_color) <> IO.ANSI.clear()
  end
end

Downloader.get_filename()
Now if you run that you’ll see that once the program ends your terminal is still
covered in the purple background color (unless you chose a different number
instead of 53). So to take care of that, let’s add a new function called
reset/0 that will reset the ANSI settings and then clear the screen at the end
of getting the filename:
  ...
  def get_filename do
    ...
    reset()
  end
  ...
  def reset do
    IO.write IO.ANSI.reset() <> IO.ANSI.clear()
  end
  ...
If you try running it now you probably won’t actually see anything in your
terminal because we’re clearing it right after painting on it. Well let’s change
that by printing our label and input and then using IO.read/1 to wait for the
user to enter a filename:
defmodule Downloader do
  ...
  @label_color 15
  @input_color 183
  @input_text_color 53
  @input_size 20
  @label_text "Filename"

  def get_filename do
    draw_background()
    draw_input()

    filename = IO.read(:line) # read the entire line when the user presses Enter

    reset()

    filename
  end

  defp draw_input do
    IO.puts IO.ANSI.color(@label_color) <> @label_text
    IO.write IO.ANSI.color_background(@input_color) <> input_box()
    IO.write "\r" <> IO.ANSI.color(@input_text_color)
  end

  defp input_box do
    String.duplicate(" ", @input_size)
  end
  ...
end

Downloader.get_filename()
|> IO.inspect(label: "Filename")
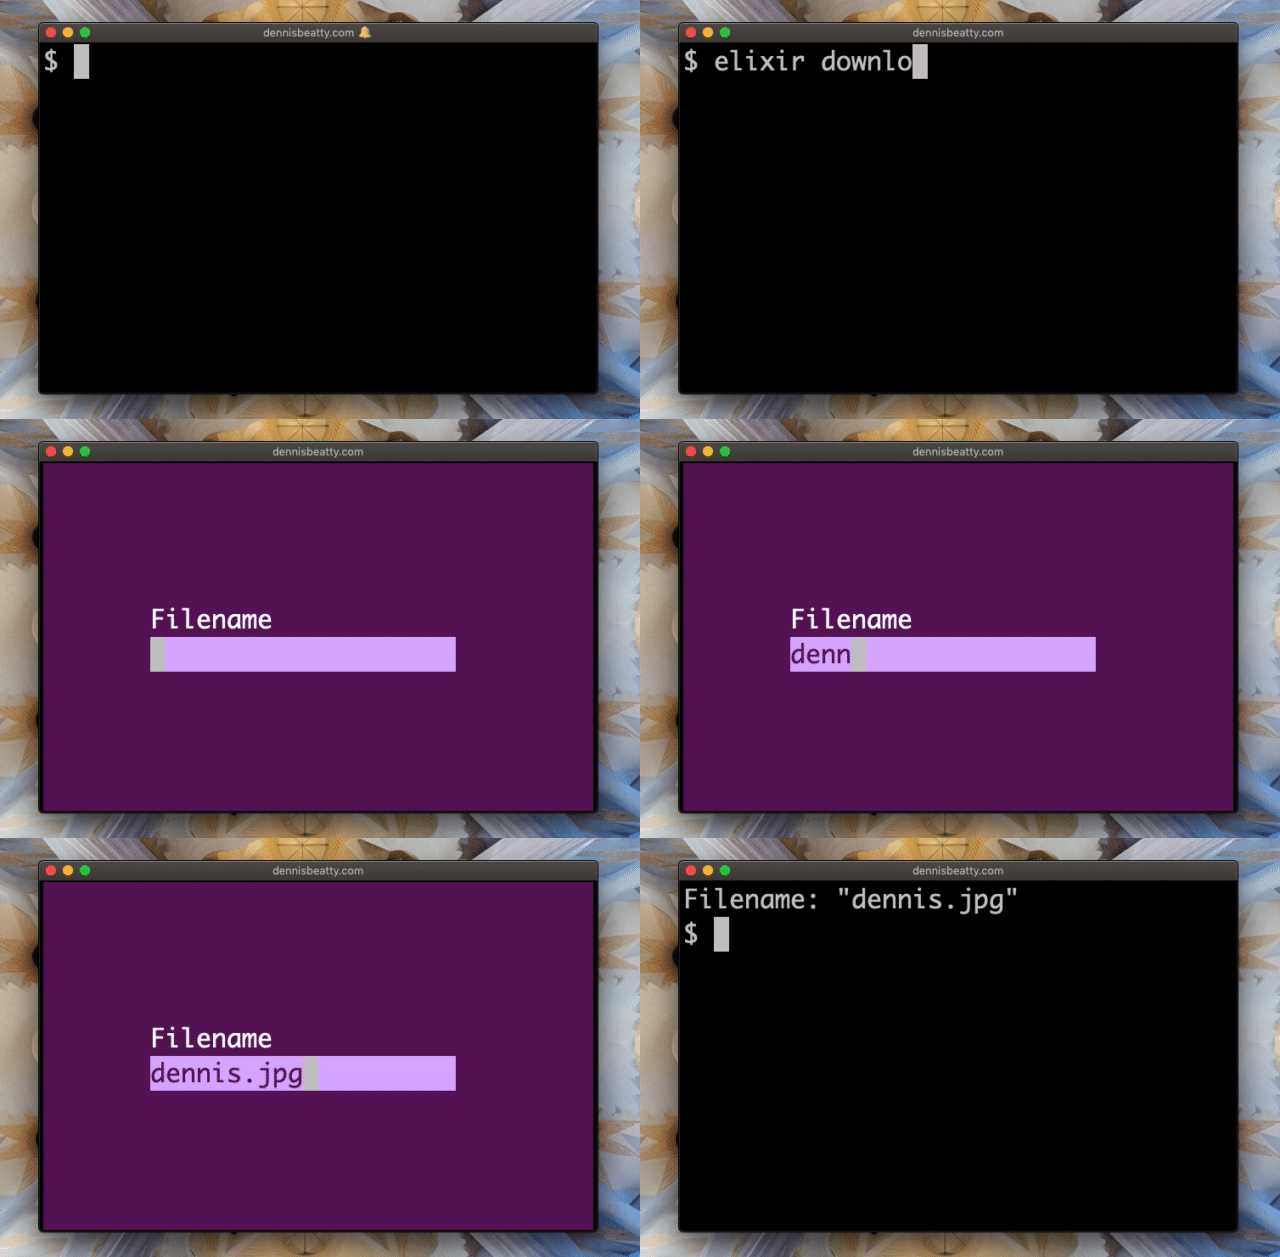
Now when you run this, you should see a purple screen with an input that says
“Filename” above it. When you type something in and press enter you should get a
line that looks like Filename: "name.ex\n". We don’t really want that newline
there, so let’s go ahead and change the returning line of our get_filename/0
function to remove it. Elixir has a handy function built in to the String
library that we can use.
String.trim/1 will remove any
whitespace from the beginning or end of a string:
  ...
  def get_filename do
    ...
    String.trim(filename)
  end
  ...
Now you may have noticed that the input is currently in the top left of the
screen. Wouldn’t it be cooler if that were centered on the screen? Well, with
IO.ANSI it’s simple to position our cursor and write somewhere else on the
screen. The problem though, is that it isn’t easy to get the size of the
terminal window. Erlang’s io library exposes io:rows/0 and io:columns/0
that are supposed to help with this. If you run in iex you should see something
like this:
iex> :io.rows()
{:ok, 24}

iex> :io.columns()
{:ok, 101}
Because of that I created the following program to try using this in our program:
defmodule Size do
  def get do
    {:ok, rows} = :io.rows()
    {:ok, cols} = :io.columns()
    {rows, cols}
  end
end

IO.inspect Size.get()
When running this program I just get a MatchError because both functions
return {:error, :enotsup}. According to the Erlang docs:
The function succeeds for terminal devices and returns {error, enotsup} for all other I/O devices.
It appears that in iex we’re exposing a terminal device, but by running elixir filename.ex we aren’t. After spending a lot of time trying to find a
workaround, I decided to let tput do the work. tput is a standard Unix
operating system command and so if you run tput cols in your terminal, it will
display the number of columns in the window and tput lines will output the
number of rows. And Elixir has a simple way to call out to another program:
System.cmd/2. It takes a command and list of arguments and returns the exit
status code and output.
If you know of any better way to get the terminal size in a program like this,
please reach out and let me know and I’ll happily
update this post. Otherwise, let’s use System.cmd/2 and tput at the bottom
of our Downloader to get our window size:
  ...
  defp screen_size do
    {num("lines"), num("cols")}
  end

  defp num(subcommand) do
    case System.cmd("tput", [subcommand]) do
      {text, 0} ->
        text
        |> String.trim()
        |> String.to_integer()
      _ -> 0
    end
  end
  ...
Now let’s go ahead and take advantage of that info in our draw_input\0
function. We’ll get the total number of lines and divide by 2 to move our cursor
halfway down the screen. Then we’ll subtract the input size from the total
number of columns and divide that by 2 to move our cursor so that our label will
be centered on the screen both vertically and horizontally and our input will be
just below it:
  ...
  defp draw_input do
    {rows, cols} = screen_size()

    # floor to get the line just above center when rows or cols is odd
    # truncate to convert float to integer
    row = Float.floor(rows / 2) |> trunc()
    column = Float.floor((cols - @input_size) / 2) |> trunc()

    # move the cursor to that position and draw the label
    IO.write IO.ANSI.cursor(row, column) <> IO.ANSI.color(@label_color) <> @label_text

    # move the cursor down a line and draw the input
    IO.write IO.ANSI.cursor(row + 1, column) <> IO.ANSI.color_background(@input_color) <> input_box()

    # move the cursor to the beginning of the input
    IO.write IO.ANSI.cursor(row + 1, column) <> IO.ANSI.color(@input_text_color)
  end
  ...
Now if you run the program your terminal should be all purple with an input in
the middle of the screen! 🎉 There’s just one remaining problem: when you run
you may notice that the filename line is printing about halfway down the screen.
That’s because we put the cursor in the middle of the screen to draw the input
and didn’t do anything to move it back. IO.ANSI comes in clutch with a
home/0 function that does just that. Let’s go ahead and append it to the end
of our reset/0 function:
  ...
  def reset do
    IO.write IO.ANSI.reset() <> IO.ANSI.clear() <> IO.ANSI.home()
  end
  ...
And voilà! We now have a module that covers the screen to display an input and reads the input out of it. Your code should look something like this:
defmodule Downloader do
  @background_color 53
  @label_color 15
  @input_color 183
  @input_text_color 53
  @input_size 20
  @label_text "Filename"

  def get_filename do
    draw_background()
    draw_input()

    filename = IO.read(:line) # read the entire line when the user presses Enter

    reset()

    String.trim(filename)
  end

  defp draw_input do
    {rows, cols} = screen_size()

    # floor to get the line just above center when rows or cols is odd
    # truncate to convert float to integer
    row = Float.floor(rows / 2) |> trunc()
    column = Float.floor((cols - @input_size) / 2) |> trunc()

    # move the cursor to that position and draw the label
    IO.write IO.ANSI.cursor(row, column) <> IO.ANSI.color(@label_color) <> @label_text

    # move the cursor down a line and draw the input
    IO.write IO.ANSI.cursor(row + 1, column) <> IO.ANSI.color_background(@input_color) <> input_box()

    # move the cursor to the beginning of the input
    IO.write IO.ANSI.cursor(row + 1, column) <> IO.ANSI.color(@input_text_color)
  end

  defp input_box do
    String.duplicate(" ", @input_size)
  end

  defp draw_background do
    IO.write IO.ANSI.color_background(@background_color) <> IO.ANSI.clear()
  end

  def reset do
    IO.write IO.ANSI.reset() <> IO.ANSI.clear() <> IO.ANSI.home()
  end

  defp screen_size do
    {num("lines"), num("cols")}
  end

  defp num(subcommand) do
    case System.cmd("tput", [subcommand]) do
      {text, 0} ->
        text
        |> String.trim()
        |> String.to_integer()
      _ -> 0
    end
  end
end

Downloader.get_filename()
|> IO.inspect(label: "Filename")
If you want to keep going with this, try pulling in what we did with the progress bar in the last post. Center it on the screen and maybe add some color to it as well. If you do, please reach out and show me what you come up with.
Curses
That’s everything I intend to cover in this post. Overall ANSI escape codes
allow you to do some really cool stuff with terminal output, and IO.ANSI is
incredibly helpful in allowing you to work with them. There are some drawbacks
however: Scroll up after running the code in our last example, and you will
notice that all the times we “cover” the screen we’re really just printing
enough lines that all we see is the new background color. It never really goes
away. We could hack that together using IO.write to write over each line with
blank characters, but there’s a better solution:
ncurses and specifically
the ex_ncurses library. It allows you
to build some really powerful command line applications, and even games.
I may write about it in a later post, but in the meantime check out these awesome examples:
Like last time, please let me know if you end up using this somewhere. Also please let me know if you have any feedback on the format of this post or the video. I especially want to know if there was somewhere in the examples that you got lost so that I can work on clarifying more in the future. You can find me on Twitter at dnsbty or on the Elixir Slack group with the same name. Or you can just let me know in the comments of the video above. I plan to continue releasing videos like this, so if you’re interested, please like the video and subscribe to my channel so that YouTube will let you know when they come out. You can also subscribe to my mailing list below or my Telegram channel for updates. Thanks for reading!